|
EMT: i migliori giradischi professionali del mondo
|
EMT: the best professional turntables in the world |
|||||
|
OVERHAULING AN EMT 929
|
||||||
|
|
||||||
| Sono estremamente grato a Alessandro Sirigu, 'Gran Sacerdote' tecnico EMT, per avermi concesso di ripubblicare sulle mie pagine questa preziosa guida allo smontaggio/ rimontaggio/ lubrificazione dell'EMT 929 | ||||||
| I am DEEPLY indebted to mr Alessandro Sirigu, 'High Priest' of the technical aspects of EMT ownership, for this wonderful photo sequence of a dismantling/overhauling/lubricating job on a EMT 929 arm | ||||||
|
Visto che è quasi Natale vi suggerisco
un passatempo interessante, alternativo alla tombola. Mentre lasciate giocare vostra suocera e i parenti tutti, per non essere accusati di asocialità, cercatevi un tavolino libero vicino. Poi andate a smontare il braccio dal giradischi e lo sistemate sopra un panno possibilmente verde (!?) e che non lasci pelucchi. Iniziate a smontare le due piccole viti del cannotto inferiore, vi troverete in questa situazione |
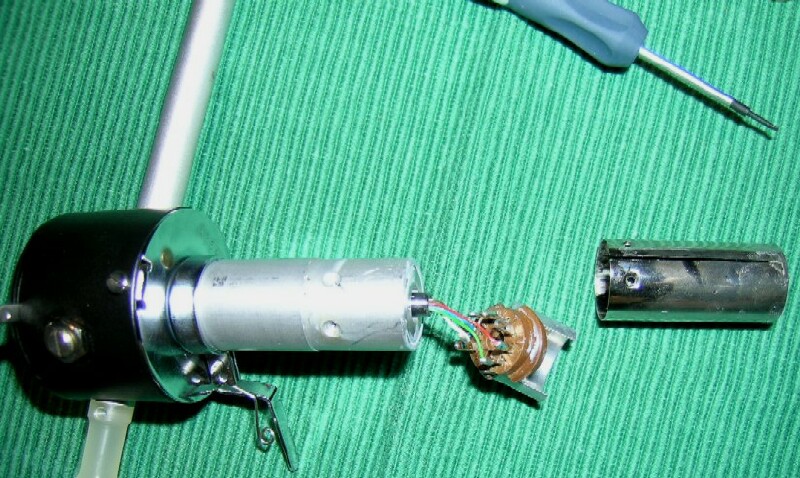 |
Overhauling your EMT 929 could be a pleasant way to spend some spare time during the Christmas holidays. First thing you must remove the arm from your turntable and put it on a green cloth pad, one that will not produce any kind of ‘hair’ or other debris. First of all please remove the two small screws under the main hub |
||||
|
Ora un colpo al saldatore e dissaldate i fili del
cablaggio alla presa. Non dimenticate di segnarvi le disposizioni dei fili per il rimontaggio |
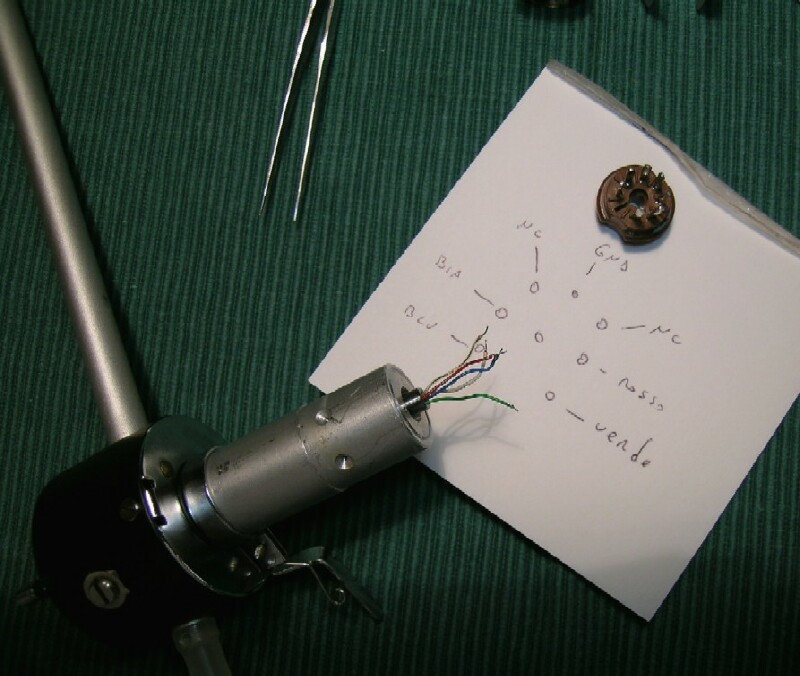 |
Now you must separate the wires from the socket with a solderer, taking care to write down the position of the wires on the socket |
||||
|
Lo zoccoletto di connessione è costituito da un 7
pin McMurdo in resina fenolica, lo stesso usato per le valvole tipo 6aq5
ecc.ecc. Se lo trovate in giro, la Amphenol ne produceva uno bellissimo in
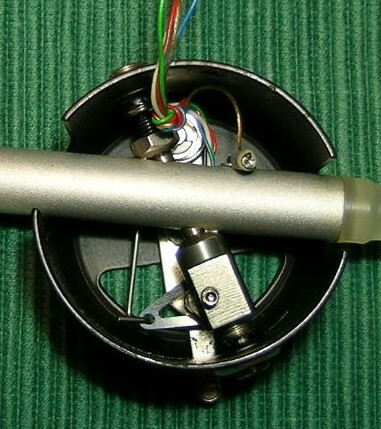
ceramica e contatti argentati, sostituitelo. Smontate ora le due viti di fissaggio dalla capsula nera e separate l'articolazione orizzontale dal braccio |
 |
The 7-pin phenolic resin McMurdo connecting socket is used also for 6aq5 tubes. Amphenol builds an even better ceramic socket with silver-coated connectors; if you can find one, please install it. Now you can remove the two small screws at the base of the black cylinder and separate the horizontal articulation from the arm tube |
||||
|
Svitate le due viti allen di blocco della flangia e
separate il perno. |
 |
Please unscrew the two Allen screws on the flange and remove the main hub |
||||
| Con una pinza a punte, o un altro utensile adatto allo scopo, svitate il fondello dell'articolazione. Estraete il perno con le sedi dei cuscinetti |
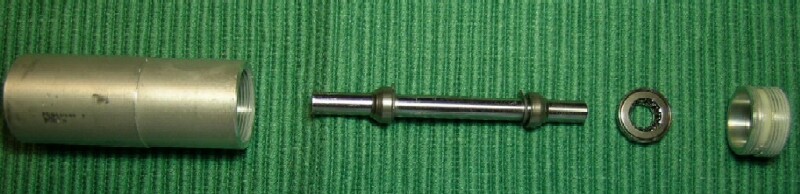 |
Please unscrew the bottom of the articulation with a pair of small pliers or a similar tool and remove the pin with its bearing housings |
||||
|
Uno dei 'segreti' del 929: il dimensionamento del
sistema di articolazione veramente notevole |
 |
One of the ‘secrets’ of the 929 is the generous size of the whole articulation system |
||||
|
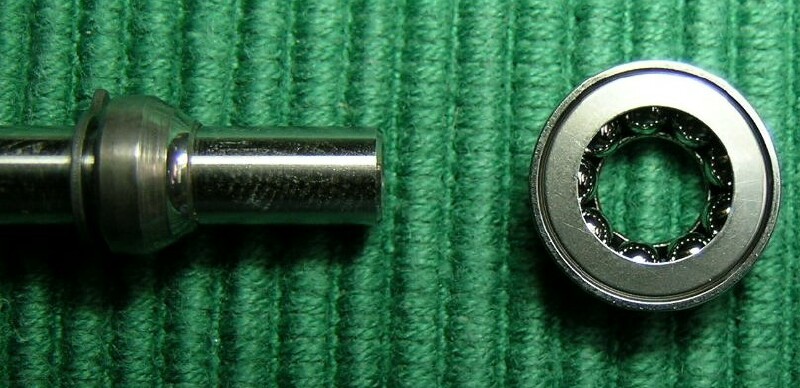
Per il lavaggio delle sedi e dei cuscinetti potete
usare questo. E' alcool isopropilico. Si può ordinare nei magazzini per forniture chimiche o male che vada in farmacia. E poi lo potete usare per le miscele lavadischi. Evapora subito e non lascia tracce |
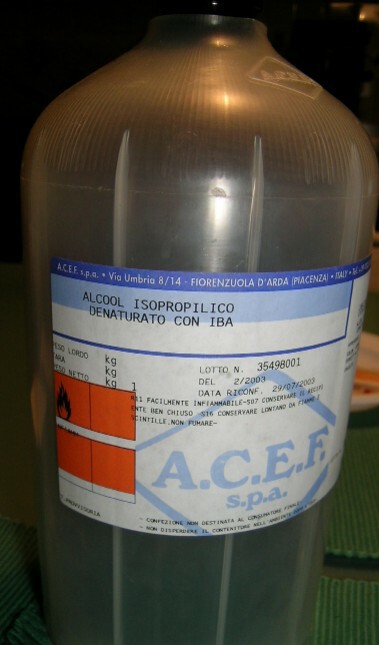 |
Isopropyl alcohol is excellent for the cleaning of the bearings and their housings; you can order it from your chemist. It’s also a component of all the good cleaning solutions used in record-washing machines. It doesn’t leave any residual Usually it’s quite difficult to remove the top bearing from its housing. Don’t lose too much time trying to remove it: cleaning it with alcohol and letting it dry is good enough. |
||||
|
In genere il cuscinetto superiore non vien via
dalla sede. Non perdete tempo ad estrarlo, sciacquatelo nel solvente e
laciate asciugare. Ora bisogna provvedere alla ri lubrificazione. Io sto utilizzando un olio per orologeria, il Moebius Synta-visco-lube 9020. E' tutto di sintesi, non evapora non si rensifica, ha un alto potere lubrificante e dura moltissimo in servizio. Si può comprare nei negozi di forniture per orologiai o in rete. Se lo prendete in boccettina potete usare una siringa da insulina per somministrarlo, in qualche goccia, sui cuscinetti e sulle sedi rettificate del perno |
 |
Now it’s necessary to re-lubricate it. I prefer a watchmaker’s oil , the Moebius Synta-visco-lube 9020. It’s a fully synthetic oil, it doesn’t dry and has a high lubricating capacity. You can buy it online or from a watchmakers’ supply shop. If you buy the Moebius oil in a bottle, you can use an insulin syringe to put one small drop on each bearing and on the sides of the main hub. |
||||
|
Riassemblate tutto all'inverso e avvitate il fondello che serve anche come
registro del gioco. Il sistema è dotato di una guarnizione di freno in
plastica. Serve a creare il giusto attrito nel serraggio di modo che non
si verifichino rotazioni accidentali. Per le regolazione del gioco bisogna usare mani sensibili e avvitare il fondello fino a quando non si percepiscono più giochi assali e laterali tra il perno di rotazione e il bussolotto. Bisogna procedere per piccole rotazioni, avendo cura di far compiere all'asse alcuni giri, in modo da permettere al lubrificante di spandersi. Dopo la regolazione far ruotare il perno, che deve scorrere libero da attriti ed eventualmente ricontrollare il gioco. Infine procedere al rimontaggio della flangia facendo attenzio a lasciare una piccola luce tra la stessa e il cilindretto di alluminio, altrimenti la regolare rotazione verrà impedita. |
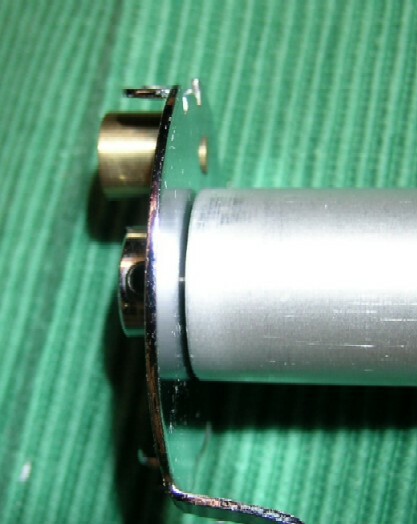 |
Now you can begin the re-assembly process screwing back in place the bottom end. This is also the part the regulates the ‘play’ of the system. It has a plastic brake. This ‘brake’ creates the right amount of grip when you tighten the system, to avoid any undesired rotation. For the correct setting of this ‘play’ you must be extremely sensitive, screwing the bottom end until you cannot feel any axial or lateral ‘play’ between the rotating hub and the main black cylinder. You must make little rotations taking care to allow the hub to turn several times so that the oil can expand freely on the surface of the parts. After this regulation, please let the hub turn so you can check that it can slide freely without any undue friction: in case you can feel any friction you must regulate it again. Then you can proceed with the reinstalling of the flange, taking care to leave a small gap between the flange itself and the aluminium cylinder, otherwise it will not be able to rotate freely. |
||||
|
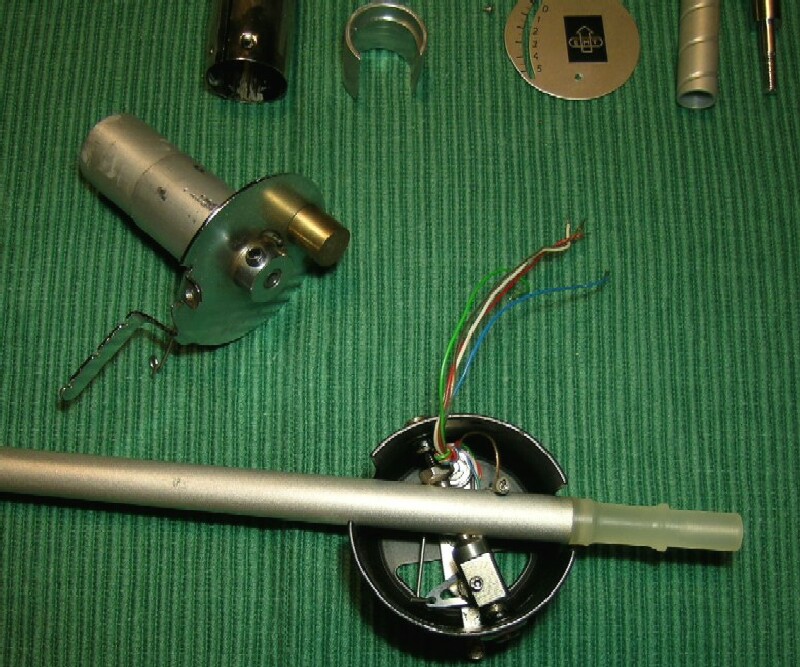
Ora passate all'articolazione del braccio Allentate i controdadi e svitate dalla capsula i supporti dei microcuscinetti. Disingaggiate l'innsto della molla di bilanciamento ed estraete il braccio. |
 |
Now let’s check the tonearm articulation. Please loosen the locking nuts and unscrew from the capsule the supports of the bearings. Disengage the balancing spring insertion and extract the arm |
||||
|
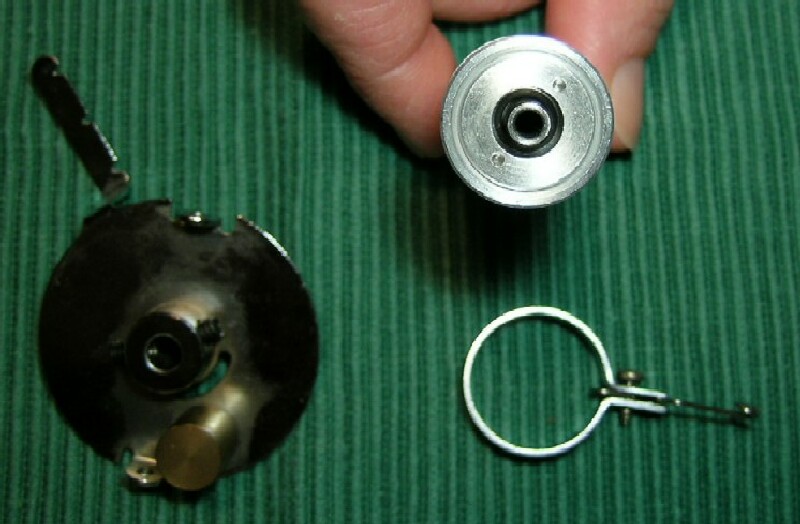
Questo è il sistema di articolazione, con
microsfere e puntoni in acciaio. Si può notare anche il sistema di collegamento alla molla per il bilanciamento del braccio con lil braccio di leva ( vite) per la taratura della scala pesi. Lavate e lubrificate con il metodo precedente i microcuscinetti ( avendo cura di non invertirli di posizione al rimontaggio). |
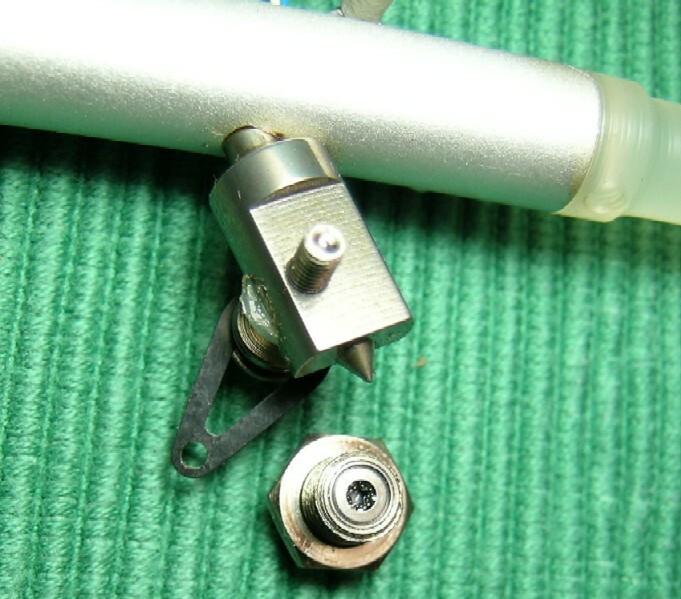 |
View of the articulation, based on microspheres and steel counterpoints. It is possible to see the linkage to the balancing spring with the arm for the weigh indicator. Please wash with alcohol and lubricate the bearings, taking care to refit them in their original position (don’t invert them). | ||||
|
Anche qui la robustezza non è optional! |
 |
Professional quality all over, even in the smallest details | ||||
|
Ecco la molla di bilanciamento, all'interno della
capsula Lavate la spirale di acciaio e rimontatela con una goccia d'olio sia nel perno di rotazione della levetta pesi che nella spirale della molla stessa. |
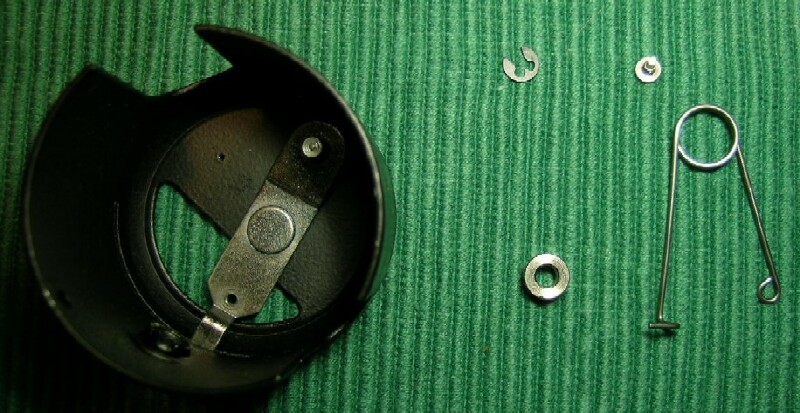 |
This is the balacing spring, inside the main capsule. Please wash the spiral and refit it with a drop of oil both in the pin and in the spiral itself |
||||
| Ecco il 929 in "anestesia generale" |
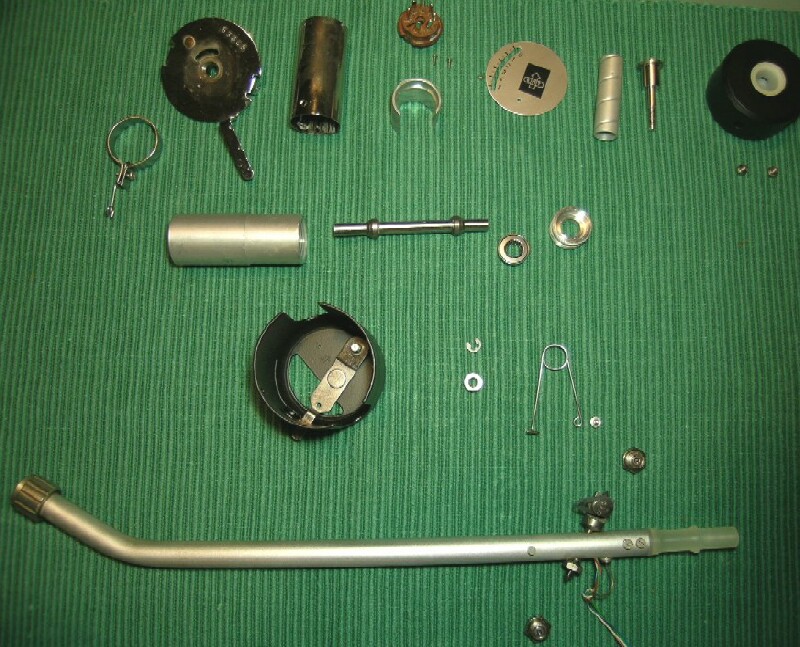 |
Coroner's view of a dismantled 929 | ||||
|
||||||